Welcome to chapter 6! We’ve had a long journey, learning all about IVF and infertility. We gave you a very condensed summary of the process in the first chapter. Now it’s time to learn about the entire process itself in detail. These are the basic and standardized steps in the IVF process, and most IVF cycles will follow this schedule. In short, the steps of IVF are:
- Booking an appointment and consultation
- Fertility evaluation and deciding on the treatment protocol
- Controlled ovarian stimulation and trigger shot
- Egg and sperm retrieval
- Fertilization and embryo development
- Embryo transfer and implantation
We will take you through each step of the process and explain in detail what happens. We will also answer common questions that you might have. By the time you finish this chapter, you’ll know exactly why and how these procedures are done.
Booking an Appointment and Consultation
If you have carefully considered getting this treatment, and are set on it, your first step is to book an appointment with a fertility clinic or a fertility specialist. For now, let’s say that you’ve booked an appointment. During your consultation, the fertility specialist will ask you questions about your medical history; any diseases you might have, medications you use, etc. They’ll also ask about your fertility journey, why you want to have a child, how long you’ve been trying, etc. All of these will give your fertility doctor an idea when developing the best treatment plan for you. After your consultation, your doctor will request some tests for fertility evaluation. Most of these teats will be conducted on the first few days of the menstrual cycle.
How do I book an IVF appointment?
If you would like more information about how you can book an appointment with Arpanu Medical, you can checkthe last chapter of our guide that's all about IVF treatment in Turkey, or directlycontact us.
Fertility Evaluation and Deciding on Protocol
When the menstrual cycle starts, you’ll be booking what is called an IVF baseline appointment. During the baseline appointment, you’ll go through some blood tests and ultrasounds to see the current state of your reproductive system. You’ll have to provide a baseline ultrasound, and a blood sample to check your hormone levels, like FSH or AMH levels. For more detailed information on fertility evaluation for female patients, you can refer back to thefemale infertility chapter. Male patients will provide a semen sample for their fertility evaluation, which you can read more about in detail in themale infertility chapter.
Depending on your test results, your doctor might recommend additional procedures to IVF, or present you with other treatment options. For example, if there is severe male factor infertility, your doctor might recommend ICSI and some type of sperm retrieval procedure. What’s important at this stage is to keep an open mind and trust your doctor with their opinion.
If your doctor decides you’re suitable for IVF, they’ll come up with the best stimulation protocol suited for you.
What is an IVF protocol?
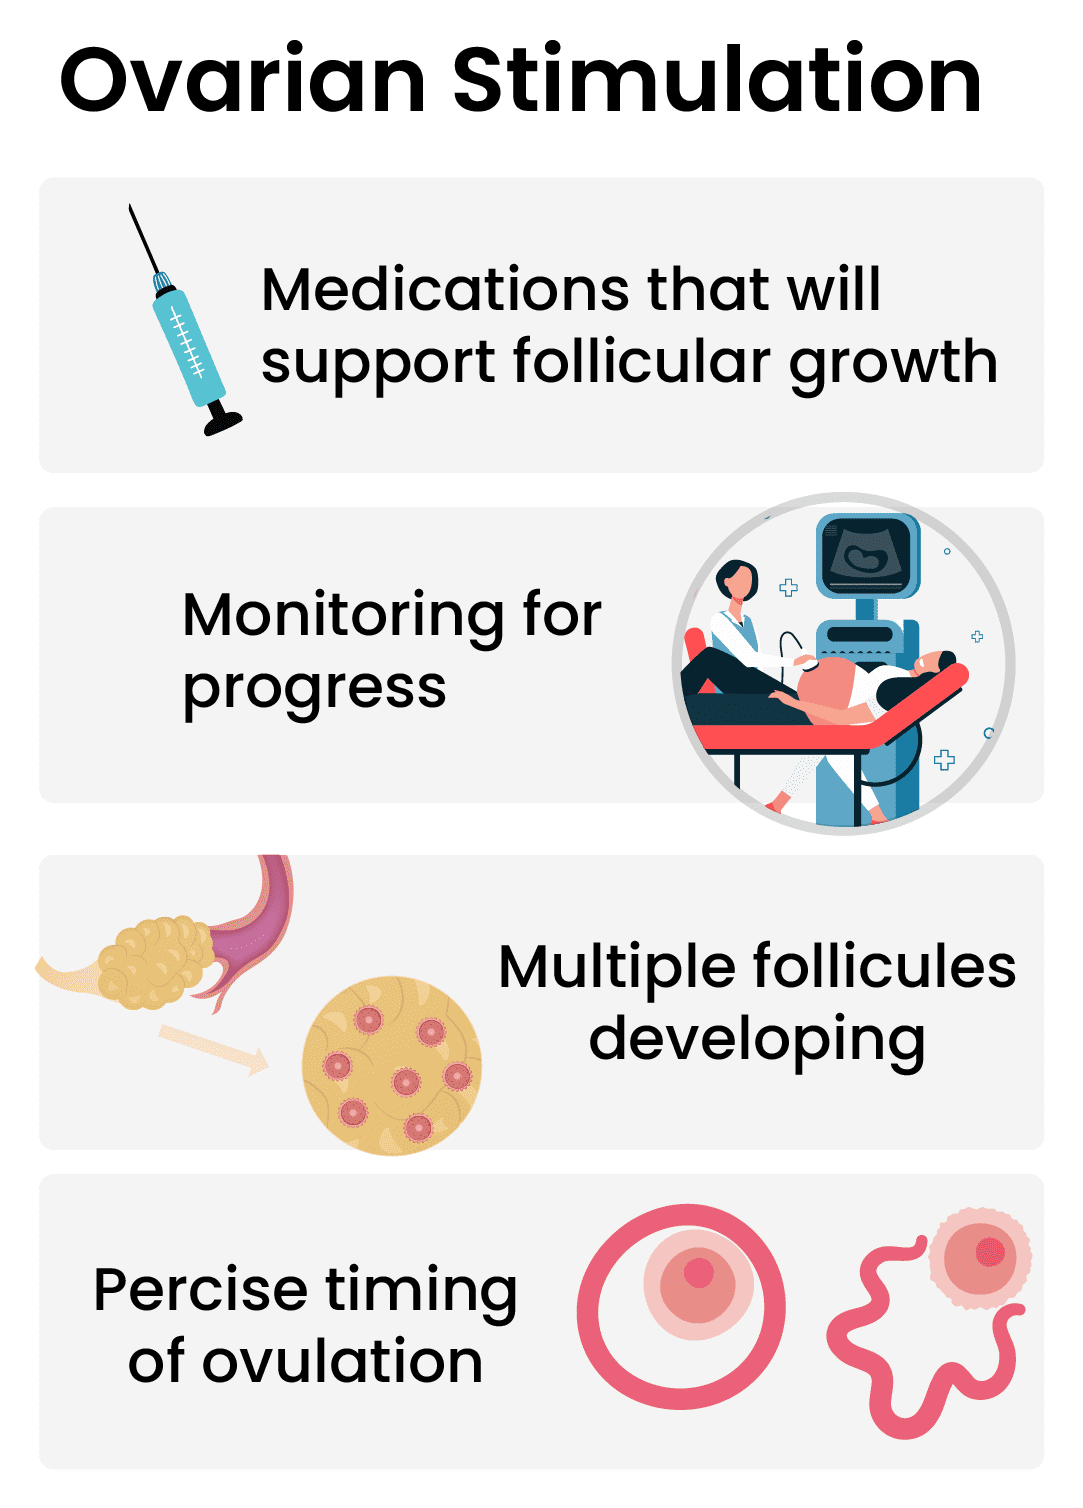
An IVF protocol is the form of controlled ovarian stimulation you’ll receive. The aim of ovarian stimulation is to produce as many follicles as possible with as few side effects, all the while preventing premature ovulation. Depending on your condition, your doctor will choose the proper IVF protocol. Different protocols can have different durations and can use different medications at varying doses.
Types of IVF Protocols
As stated, there are a few different types of IVF protocols, most patients will follow one of these traditional protocols:
- Long protocol, also known as down-regulation or agonist protocol which is the typical IVF protocol
- Antagonist protocol
- Flare protocol, which is also known as short protocol, micro flare protocol, etc.
Stimulation protocols differ in a few ways from each other. The first way is the type of medications, and the amount used. Different medications will take over the reproductive system in different mechanisms, which can affect the duration and the possible side effects of the treatment. The amount of the medications used will have an effect on possible side effects, and the effectiveness of the treatment.
Controlled Ovarian Stimulation and Trigger Shot
After deciding on the protocol, you can begin controlled ovarian stimulation (COS). This is your chosen protocol in action. Your clinic will present you with your IVF medication schedule; which medication you have to take each day, and how much. This will be a detailed calendar and also includes your monitoring appointments. They will also teach you how to administer the daily injections of fertility medications yourself.
Every day, you'll be taking injectable medications to increase the number of follicles growing in your ovaries. And every few days you’ll have to pay a visit to your clinic so they can monitor your hormone levels, ovaries, and uterus with blood panels and ultrasounds; and determine if you’re responding to the treatment as intended. If you're presenting with severe symptoms or not growing enough follicles, your cycle can be cut short or canceled. Ideally, you develop enough mature follicles without severe side effects from the treatment.
The aim of COS is to make your ovaries produce multiple eggs at once. Once the follicles reach the appropriate size, a ‘trigger shot’ is administered, which helps to mature the eggs for fertilization, and after 34 to 36 hours, the eggs are collected.
The trigger shot is the final step of ovarian stimulation. The purpose of the trigger shot is to cause ovulation at a specific time, so the eggs can be harvested. In the natural cycle, after ovulation, if the egg doesn’t get fertilized, it vanishes. So it’s very important to collect the eggs when they’re mature enough for fertilization, but right before they ovulate.
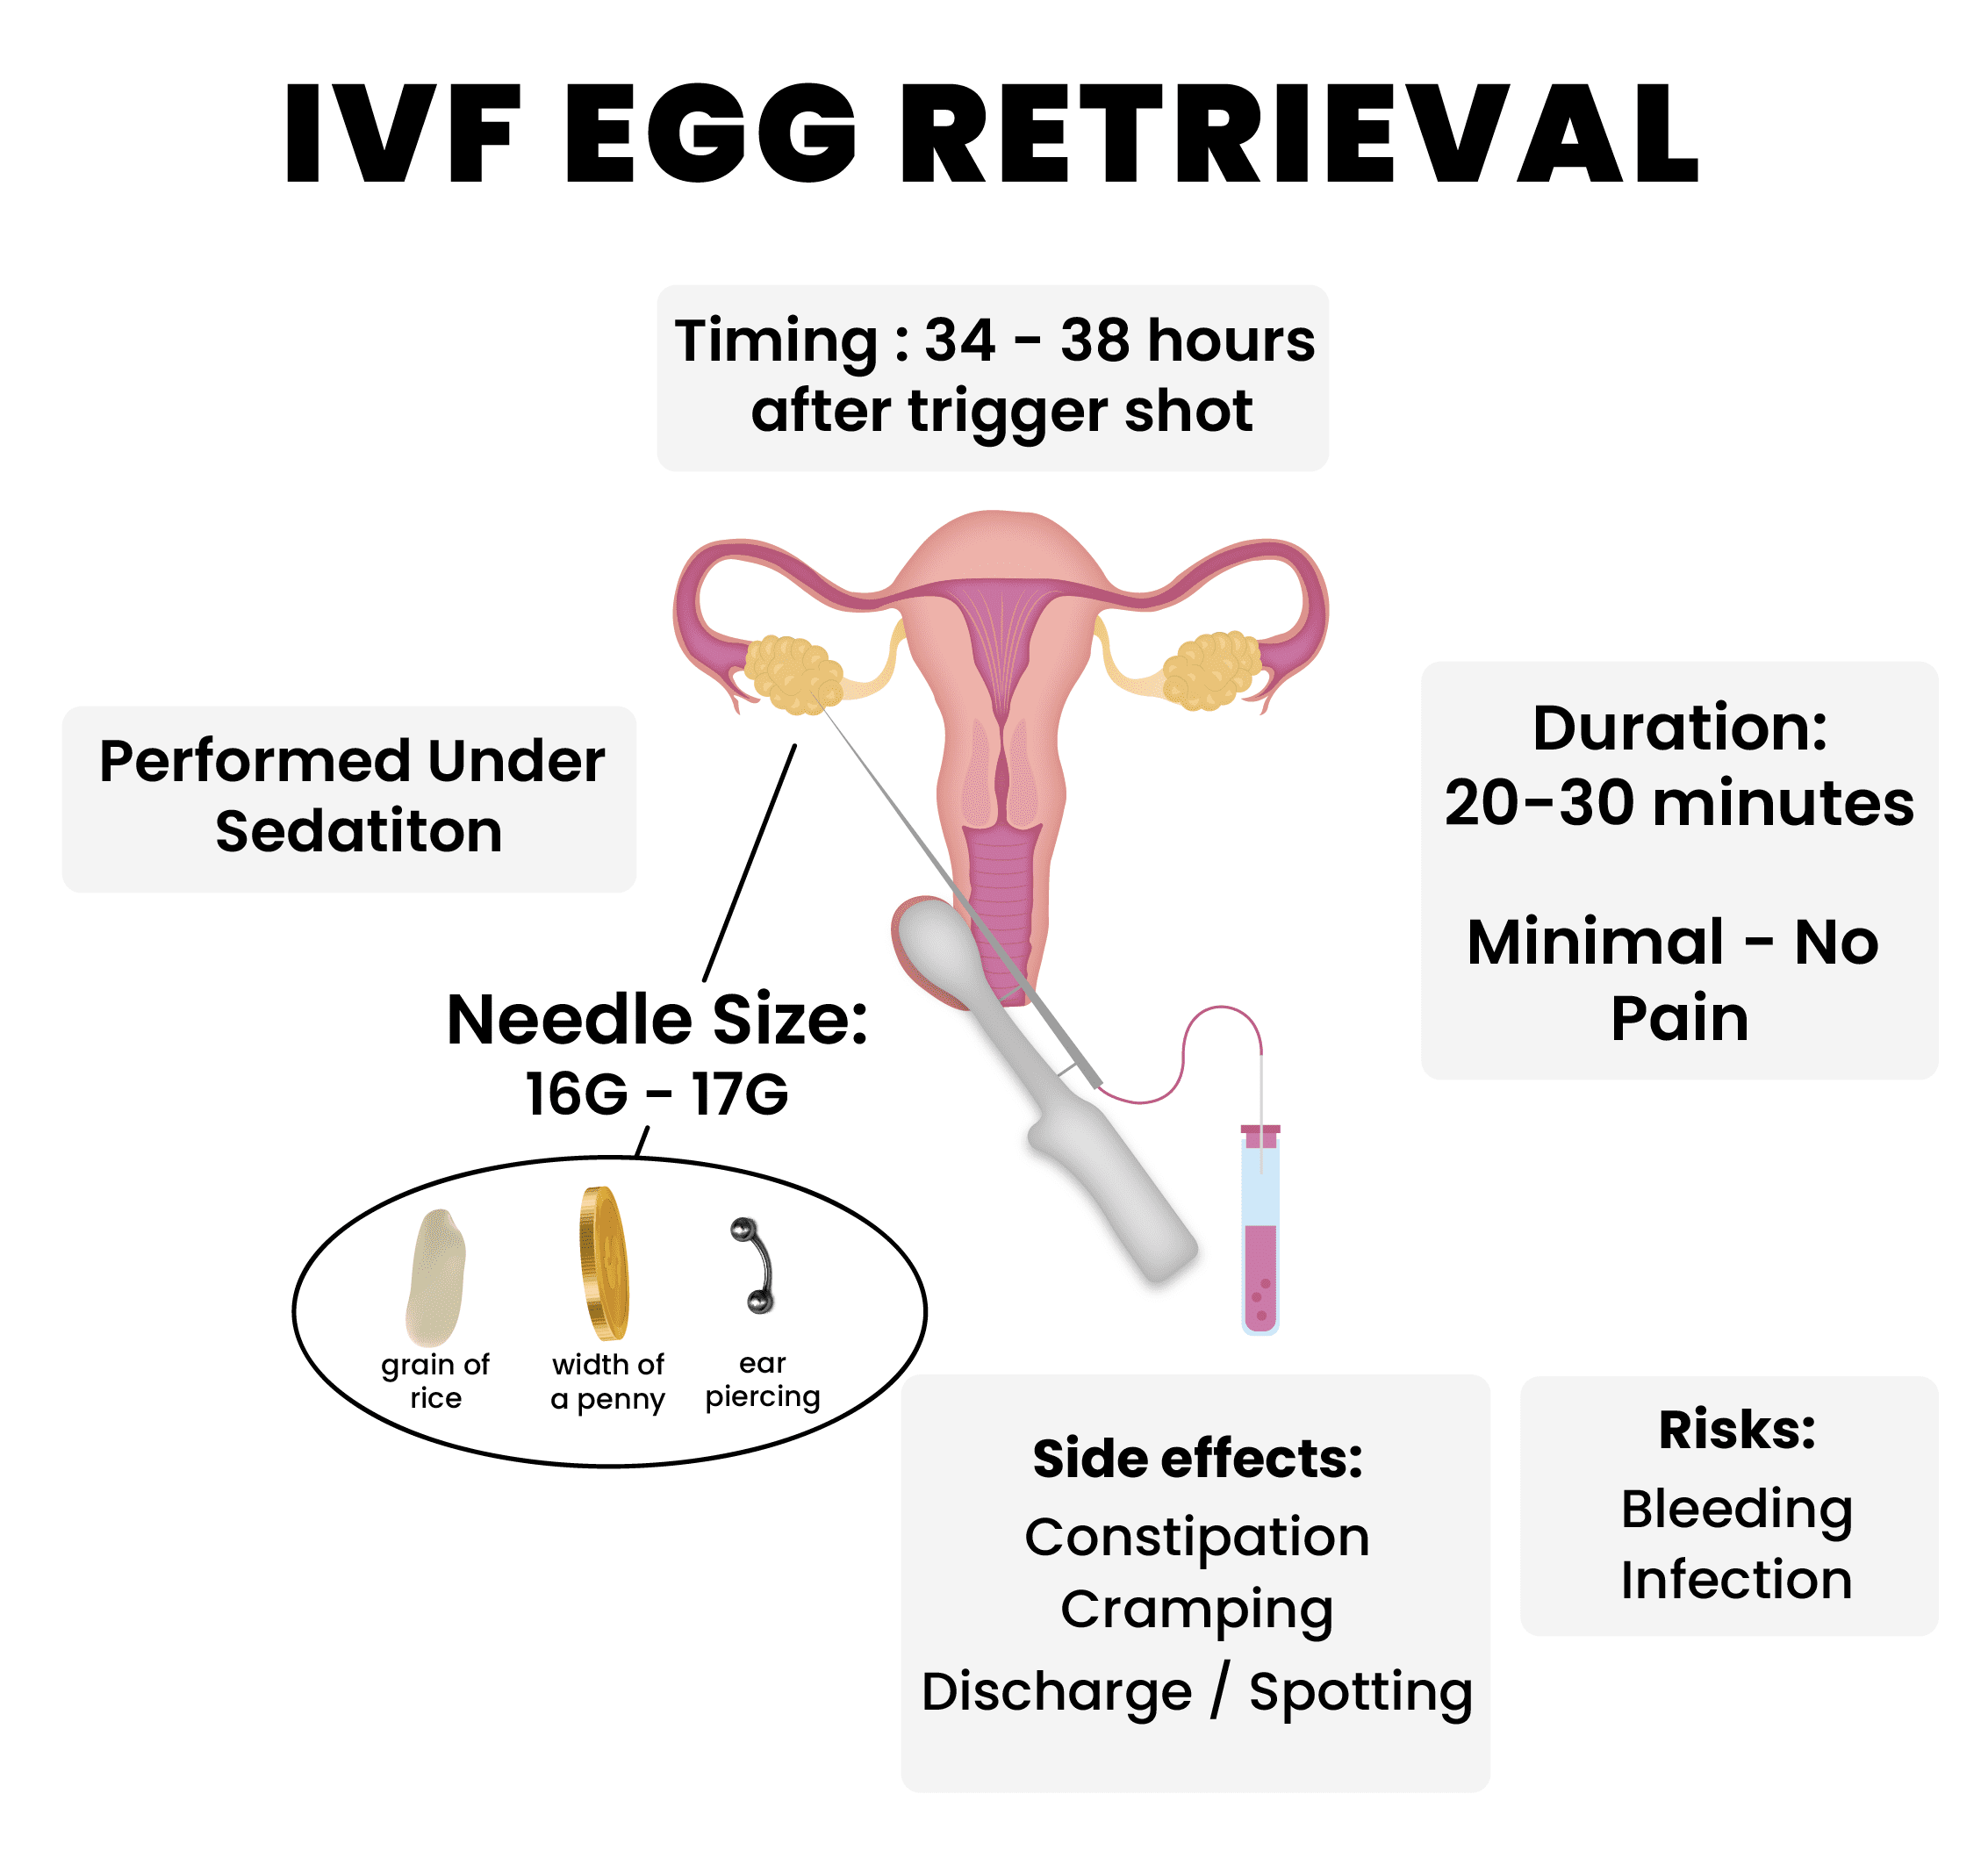
The trigger shot is delivered just like other IVF medications. Precisely 34 to 36 hours after the shot, egg retrieval is performed. The duration between the trigger shot and retrieval should not exceed 38 hours. [1]
For more detailed information on IVF protocols, ovarian stimulation, and the trigger shot, you can read our guide to IVF stimulation. The guide answers all the questions you might have and gives detailed information regarding the treatment protocols, medications and their side effects, and the process itself.
Egg and Sperm Retrieval
34 to 36 hours after the trigger shot, it’s time for egg and sperm retrieval. By this point, the female patient’s eggs should be mature and ready for retrieval. For the male patients, they’ll either provide a semen sample, or they’ll go through sperm retrieval surgery on the same day as egg retrieval. Let's look at the egg retrieval process in detail.
How are eggs retrieved for IVF?
Eggs are retrieved by ultrasound-guided transvaginal aspiration. The machine used during the procedure has a vacuum pump, which will aspirate the oocytes, a connection tube where oocytes are collected, and a 17g needle that will pick up the eggs. The machine is inserted into the vagina, and a puncture is made from the side of the vagina towards the ovaries. The eggs are collected via aspiration, into a tube. Immediately after the procedure eggs are sent to the lab for egg grading and fertilization. [1]
What is the average number of eggs retrieved during IVF?
The average number is between 10-20, given you responded to stimulation well. For more information on how the amount of eggs retrieved can affect your success rates, you can check out Chapter 4 where we talk about the IVF funnel.
Does egg retrieval hurt?
No, under light sedation administered for the procedure most people won’t feel pain. However, it’s normal to experience slight abdominal pain and cramping 1-to 2 days after the procedure.
Do you get anesthesia for egg retrieval?
During egg retrieval, patients are put under light sedation usually via Bupivacaine. If the ovaries are particularly hard to reach, or the patient has a low pain tolerance, general light anesthesia might be administered with Propofol.
How big is the egg retrieval needle?
The needle of the machine can have a single or a double lumen and is between 16g (0.064 inches or 1.6 millimeters) or 17g (0.056 inches or 1.4 millimeters) depending on the preference of the doctor. To actualize it 16g-17g is around the width of a single grain of rice, and the thickness of an American penny, or an ear-piercing. If your specialist is skilled enough, there won’t be damage to the oocytes during pickup. And since you’ll be under sedation, you won’t feel the needle.
How long does IVF egg retrieval take?
The procedure itself takes 20-30 minutes. After the procedure, you’ll rest at the hospital for 1 to 2 hours and then you’re able to go home. So, in total, you’ll be spending around 2-3 hours in the hospital for the procedure.
IVF Egg Retrieval: Side Effects and Risks
Egg retrieval is a relatively easy and quick procedure to perform. However, it's still a surgical procedure with potential risks and side effects ;
- Constipation after IVF egg retrieval is a common side effect people can experience. It’s mostly a symptom of ovarian stimulation which is still affecting the body.
- Cramping after IVF egg retrieval is also very common. Because your internal organs were punctured it’s normal to experience some abdominal cramping the next 1 to 2 days after retrieval. If the cramping persists, contact your doctor.
- Vaginal discharge or spotting after IVF egg retrieval can be a result of the punctures made through your vagina. During the healing process, it’s normal to experience some discharge or faint spotting. If the spotting reaches ‘bleeding’ levels, contact your doctor immediately.
- Infection after IVF egg retrieval is uncommon. Because of the safety and hygiene measures in place, most people won’t get an infection at all, nonetheless, it’s still a risk of the egg retrieval procedure. If you’re experiencing severe abdominal pain and have a fever after the procedure, contact your doctor immediately.
What happens after IVF egg retrieval?
After egg retrieval, the cells are directly sent to the lab for inspection. In the lab, the embryologists follow a procedure called ‘egg grading’ where they will decide which eggs are of the best quality and can provide the best results. Eggs need to be mature to get fertilized. So the first step is to rule out immature cells. These immature cells can be incubated so they can complete their maturation, which will increase the number of eggs available for retrieval.
The egg cells will be stripped of the protective outer layer to ensure that sperm has the best chance of fertilizing. At the same time, the sperm retrieved via ejaculation or a sperm retrieval surgery will be washed until only the sperm cells are left.
After this point, the cells are ready for fertilization via IVF or ICSI (Intracytoplasmic Sperm Injection). Or, if preferred, the oocytes and sperm can be frozen for fertility preservation or a frozen cycle.
Fertilization and Embryo Development
After retrieval, fertilization needs to take place as soon as possible. When it comes to IVF, there are 2 ways an egg can be fertilized. With traditional IVF, the egg cell and washed sperm cells are put in a petri dish, and the sperm cells fertilize the egg on their own. With ICSI, a single sperm cell is directly injected into the egg. While ICSI has a fertilization rate of 98%, with traditional IVF there is a chance that not all eggs get fertilized.
Why do eggs fail to fertilize?
There is no guarantee that all eggs retrieved for IVF can be fertilized. The most common reasons are egg and sperm defects and insufficiencies. There might also be problems with the genetic material of the gametes; genetic fragmentation, incomplete chromosomes, etc. are all things that can contribute to fertilization failure. If the problem is caused by a male factor, IVF combined with ICSI can help with fertilization.
After fertilization occurs, now it’s time to wait for the fertilized egg to develop. During the incubation process, Embryoscope can be used to monitor the development of the embryo. The zygote should start developing in 24 to 48 hours, and in 5-6 days it will reach the blastocyst stage and be ready for transfer.
Stages of Embryo Development
After fertilization, monitoring for embryonic development begins. The zygote is left to incubate until it's at the optimal developmental stage for implantation. In the past, embryo transfer would be performed on the 3rd or 4th day at the morula stage, but this technique is now reserved for special cases as it has a lower success rate.
When an egg is fertilized naturally, the event takes place in the fallopian tubes. By the time it reaches the uterus to implant itself, it’s what is called at ‘blastocyst stage’ which is 5-6 days after fertilization. When an embryo is transferred at this stage into the uterus, it has better chances of implantation. However, if your fertility specialist thinks that the embryos might not reach the blastocyst stage, they can also perform the transfer on day 3.
IVF Embryo Development: Day by Day
Day 1: Fertilization occurs. The zona of the egg cell hardens so other sperm cannot enter the egg. The egg and the sperm start exchanging genetic material. The first cell division occurs around 24 hours later.
Day 2: On the second day, each of the 2 cells produces copies. Right now, the embryo has 4 cells in total. From now on, the cells will continue to divide every 12 to 24 hours.
Day 3: The embryo is at 8 cell stage. The cells will keep dividing. If your specialist thinks the embryos cannot reach the blastocyst stage, they’ll conduct a day 3 IVF transfer.
Day 4: Around day 4, the embryo has 16 to 32 cells, and is at the morula stage. After this point, the cells will start to divide at a rapid rate.
Day 5: The embryo is now at the blastocyst stage and ready for transfer. At this stage, we can divide the cells into two groups, the outer cells that are encompassed by the zona will turn into the placenta, and the inner cells that are stuck together will develop into a fetus.
Now, pre-genetic tests can be conducted by performing a biopsy. If done correctly by a skilled embryologist, this biopsy won’t affect the embryo.
Day 6: After blastocyst transfer, the embryo and the zona separate, which allows the embryo to implant in the uterus and start growing into a fetus.
Day 7: The embryo is now fully hatched, and implanted into the uterus.
IVF Embryo Grading
Embryos are regularly checked and graded on their morphological qualities throughout their development. Embryo grading is a system doctors and embryologists use to find the best quality embryo available for transfer. As the embryo quality goes up, so do the chances of implantation, pregnancy, and live birth. In choosing the best embryo, there is also the advantage of avoiding the transfer of multiple embryos, which can lead to multiple pregnancies.
Embryos can be graded from the moment they reach 2 cell stage. Due to faulty genetic coding, even 2-cell stage embryos can present with anomalies such as abnormal size, nucleation, and fragmentation. Sometimes embryos that have quality issues at 2 cell and 4 cell stages can develop into healthy blastocysts.
The final assessment is done at the blastocyst stage. The grading is depended on 3 aspects; the cavity of the blastocyst should be well expanded, the inner cell mass should be made of uniform, even cells, and the trophectoderm should be evenly formed. Each aspect is graded on its own, and their combination shows the best blastocyst available. On average, half of the eggs that were fertilized will reach the blastocyst stage and present as normal. [2] [3]
What happens if all the embryos are abnormal?
Especially with advanced age, it is very difficult for the fertilized eggs to develop into good-quality blastocysts. In these cases, with additional tests or procedures, it might be possible to transfer a ‘low grade’ embryo. So if you’ve been informed that none of your blastocyst stage embryos are viable for transfer, do not lose hope and consult your doctor about possible steps forward. The most common strategies in these cases are performing Preimplantation Genetic Testing to see if the embryos are healthy, or opting for frozen embryo transfer to improve blastocyst quality.
What do I do with extra embryos?
With unused embryos, you can store them in cryostorage if you'd like to get pregnant in the future. If now, you can discard or donate your viable embryos.
Embryo Transfer and Implantation
Embryo transfer is the most crucial step in the IVF treatment process. The goal of this procedure is to transfer the healthy embryos into a perfect spot in the uterus without causing damage to the embryos, or the reproductive system. It should be the easiest, the most seamless part of IVF without pain or discomfort.
When is embryo transfer done in IVF?
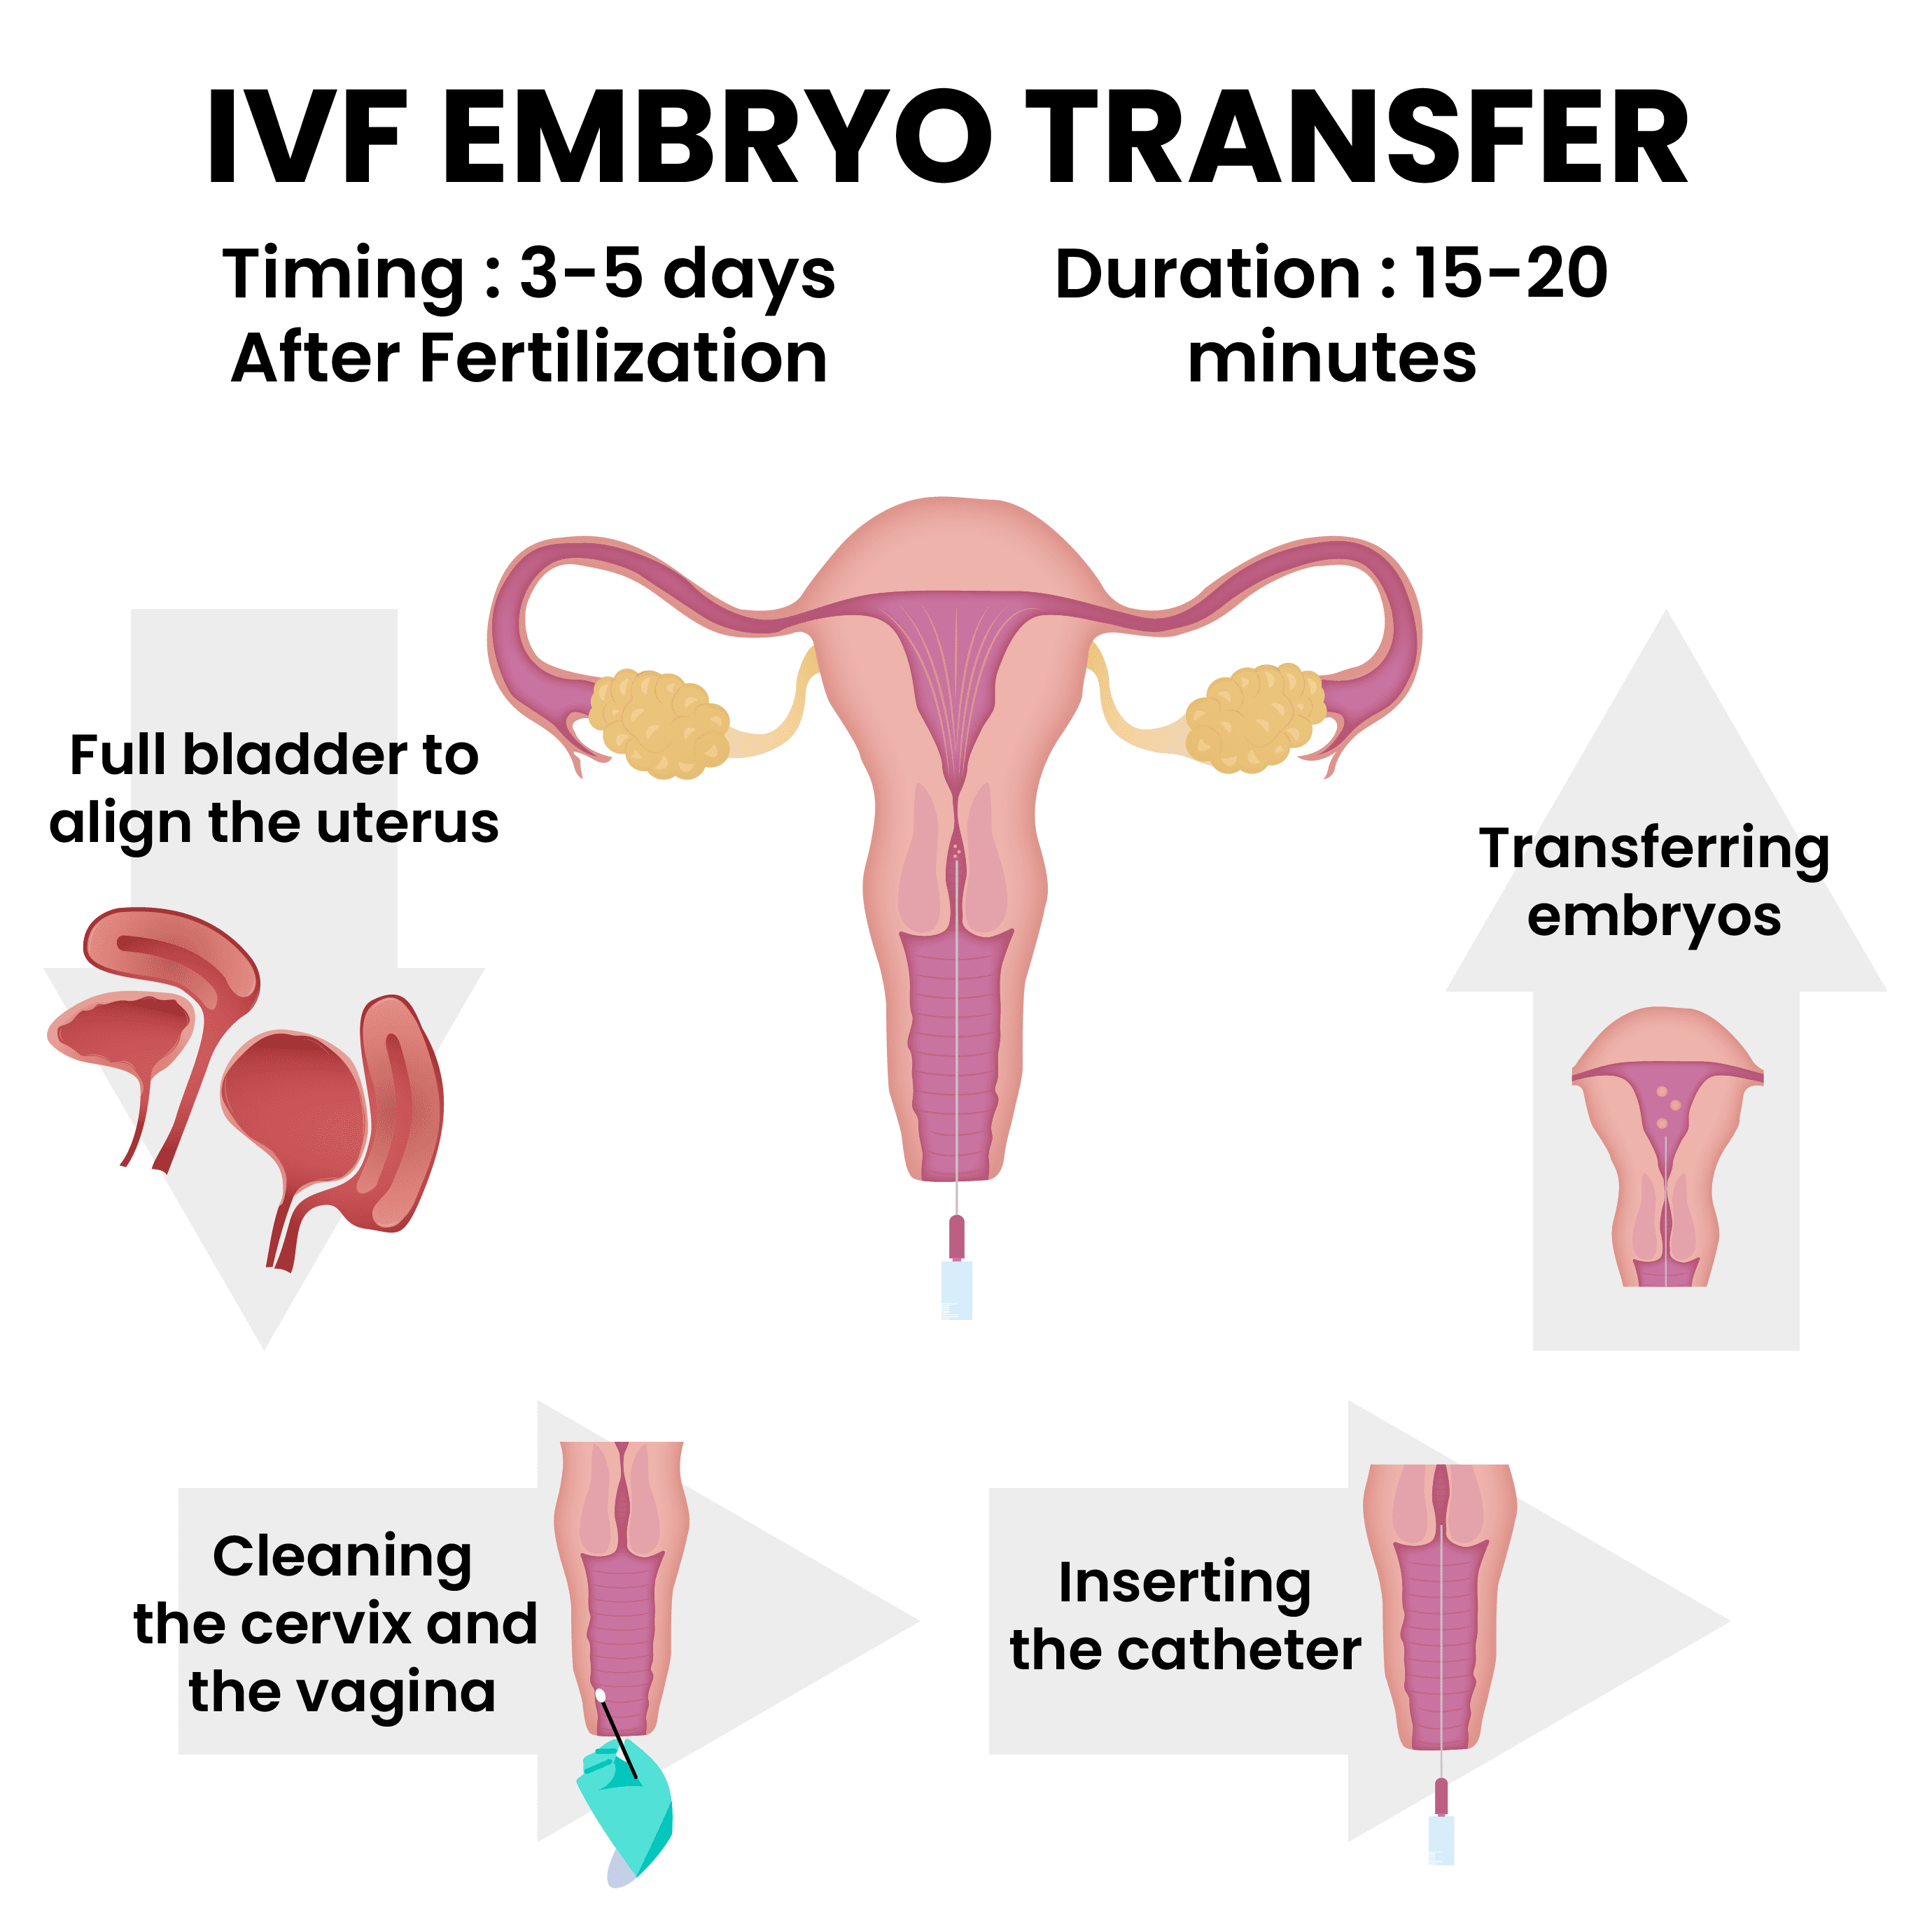
With fresh cycles, embryo transfer is performed when the embryo reaches the blastocyst stage, so 5-6 days after egg retrieval. If the fertility specialist believes that the embryos might not survive until day 5, they can opt for a 3-day transfer. If it’s a frozen cycle, embryo transfer can be performed any time in the future, after the uterus is optimized for implantation.
How long does IVF transfer take?
With the preparation of the procedure, the entire transfer process is around 15-20 minutes. The actual transferring of embryos should take 2 minutes at most since they are unequipped to survive the conditions outside the uterus, incubation, or cryopreservation.
IVF Embryo Transfer Process
Let’s go over the details of the embryo transfer procedure so you know exactly what to expect.
- First, your doctor will ask you to drink water and fill your bladder, but you should still be comfortable. A filled bladder will make your uterus align into the correct position.
- You’ll be sitting on a stirrup chair. Since embryo transfer is a painless procedure, anesthesia or sedation is not required.
- A speculum will be used so the doctor can see the cervix. Then the cervix and the vagina will be cleaned to get rid of mucus.
- A catheter will be inserted into the uterus, and the embryos will be injected into the uterus. After the procedure is done, you are free to get up and resume your regular activities.
IVF Embryo Transfer Risks
Even though it’s a simple and painless procedure, embryo transfer can be difficult for some patients. Although most aspects that can present complications are dealt with before the procedure, complications can arise at any moment. The chance of having a difficult embryo transfer is very low at 5 to 7 percent, so most patients won’t have a problem with their procedure. Here are some possible complications that can occur during embryo transfer:
- Expelled embryos: If the embryos are not transferred into the right spot, they can move back to the cervix instead of remaining in the uterus and implanting. This can be easily prevented by measuring the uterus beforehand to determine the best spot for transfer, cleansing the cervix, or using Embryo Glue. This risk is entirely dependent on your doctor and how experienced they are.
- Contractions: If contractions are triggered during transfer, it can cause the expulsion of embryos. Around 30% of patients going through IVF will experience uterine contractions. For this reason, your doctor will try to avoid touching your cervix. However, there is no guarantee that you won’t experience contractions since even the catheter used for transfer can cause contractions. To prevent contractions, your doctor might prescribe a vaginal progesterone gel.
- Contamination: The catheter itself may be contaminated or blocked by blood or mucus, making the procedure difficult.
- Damage to the uterus: The presence of blood can indicate damage to the uterus. If there are fibroids or polyps in the uterus the catheter can have blockages in its way. And if the uterus is abnormally shaped, the catheter can poke the uterus.
- Fluid in the uterus: 2 to 3% of women going through IVF might face this problem. In 25%of patients, this is caused by a blockage in the fallopian tubes. It can also be caused by other tubal factors, infection, or an abnormal uterus. If it’s discovered during the transfer that you have fluid in your uterine cavity, you’ll have to go through a frozen cycle to save your embryos and optimize the uterus. In some cases, the fluid can be aspirated and transfer can continue, however this course of treatment is experimental.
- Retained embryos: In less than 3% of transfers, embryos can remain in the catheter. This situation is extremely rare, and when it’s noticed the remaining embryos are immediately transferred. [1]
IVF Embryo Transfer: What works and what doesn’t
In the public mind, there are some misconceptions about things that you can do before transfer that can increase implantation rates. We want patients to know that this procedure is extremely dependent on the doctor’s skill levels. Let’s go over the things that do not work first:
- Acupuncture before IVF transfer is said to have benefits with implantation. The studies performed on the subject present insufficient and unreliable evidence. For now, acupuncture seems to provide no benefit when it comes to implantation rates. [4]
- Using Antibiotics before and after the transfer does not affect the outcomes of the procedure. It’s thought that the prevention and absence of infections in the body could lead to better outcomes, yet the data is inconclusive and insufficient.
- Alternative or traditional medicine seems to provide no benefits to IVF outcomes. It’s best to avoid the use of any substance that can interfere with hormones during IVF.
So, if all these things do not have an effect on IVF outcomes, what does? What are some procedures that can help with implantation rates?
- Mock Transfer is a procedure that can be performed at any point, or before IVF treatment. But it’s strongly advised that it’s performed right before embryo transfer as it provides the best results. A mock transfer measures your uterus, so the embryos can be transferred to the best spot.
- Embryo Glue is a substance with high hyaluronic acid content. Hyaluronic acid can improve implantation rates by binding the cells of the blastocyst into the uterine lining. Embryo glue can increase pregnancy rates in patients who have had repeated implantation failures. [5]
What happens after IVF transfer?
You can think of the transfer as the end of your treatment cycle. In the next chapter, we will discuss all the variables in-depth and will give you tips on how to manage the aftermath of the transfer. For a quick overview, here are some possible outcomes;
- Pregnancy: Hopefully, the embryo will implant and the pregnancy will result in a live birth. This is the intended outcome of any Assisted Reproductive Technology treatment.
- Chemical pregnancy: The embryo implants, but a very early miscarriage occurs in the first 5 weeks after implantation:
- Ectopic pregnancy: The embryo implants somewhere other than the uterus, and is not able to survive. Ectopic pregnancies are extremely dangerous and can lead to the death of both the mother and the baby if the pregnancy isn’t terminated.
- Implantation failure: The embryo doesn’t implant and dissolves.
Now it’s time to move on to 7, where we will discuss the aftermath of the transfer in detail.
